Tuesday, March 12, 2013

I AM READY FOR SUMMER!

I am so over this winter weather. One day it snows, and the next it's 66 degrees.
 
That's Ohio for you!
 
I have SO many things I want to sew! I just started on the CUTEST little Ruffle Bottom Sun Suit for Emmaline to take on vacation with us in May, and I hope to finish it soon - and maybe add a few to my etsy shop.  OMG, can you just feel the cuteness oozing from this sneak peak?

 
I also have a quilt on the agenda, and Project Run and Play! You can read more about it by clicking the button in my right side bar. I have the first 3 weeks figured out- and if I have time will do week 4!

Here is a sneak peak of week 1:


  I would also like to put together a few handmade gifts/fold over clutches.

 For now though, I would love to show off something that has become quite the hit in my little Etsy shop, that is also perfect for SUMMER.


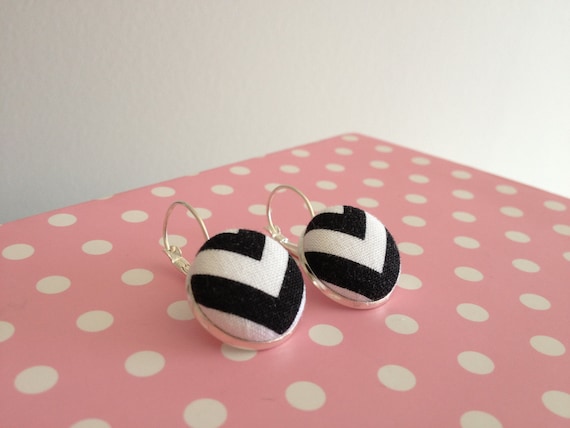
Fabric covered button earrings. I started out making just studs for the shop but ended up putting together a few options in a drop style. Aren't they lovely?


Go take a look, right here. They are inexpensive and SO adorable. I love them and made myself a pair in almost every color. My favorite (if I had to pick) are the black and white chevron drop style earrings. I am going to be adding more in a larger size soon, that you will swoon over!
 
Black and White Chevron Earrings- size 3/4"
 
Have a great week everyone!
 
L

Sunday, March 10, 2013

Kids Elastic Flower Belt Pattern

I am TOTALLY an accesory girl.  I have a million pairs of earrings, necklaces, belts, hats, shoes, and bags. What girl doesn't?  I think my girls are becoming accesory girls too.

Gotta start early, right?

I love when my girls wear simple outfits. Jeans and t-shirts. A tank and shorts or if they just throw on a dress.
But sometimes a t-shirt and jeans or a simple dress just needs a little something extra.
That's why I came up with this little accesory for my girl. It's the same principle as an elastic headband. It's just made a little bigger, and with a little bit more pazazz.

I don't really like the look of shirts tucked into pants for little girls and I don't think that regular belts are comfortable when they are playing. So insted of a plain belt I put a spin on it.
 
Want to see how?
 
 
This tutorial has been turned into a Pattern that is now available in my etsy shop, here and here

ENJOY!


 You can do so much with this pattern, dress it up or dress it down, use chiffon or use quilters cotton!


The pattern includes 3 different flower size options, and sizes 18/24 months to 6t!


What a great deal!


You can even sell your finished products on ETSY!


Have fun, and let me know if you have any questions!
L


Saturday, March 9, 2013

Emmaline is 9 months!

Each month I keep track of Emmie's "birthdays". I take a picture of her and document what she is doing on the 8th of each month. Babies change so much in the first year. I want to remember all of it.
 
 Learning new things, doing new "tricks." I didn't keep track of what Hannah did so well, so I am going to try to make up for it with Emmie!

Here is my sweet, sweet, Emmaline Josephine on her 9 month birthday....Excuse the quality of the pic. I took this on the go with my iphone.
 

She doesn't want an iPad for her birthday really, but maybe? Hehehe


Love you so much my sweet baby girl!  Wish you could stay this size forever!
XOXO

Tuesday, March 5, 2013

Half & Half Leggings

The other day I saw some kids leggings online that were so cute. I have NO idea what they are really called. They were just leggings but the bottom half of them was a different fabric and made them look like leg warmers.  They were embellished with little buttons on the side too.
Genius idea!
 I thought,
 
"MY GIRL HAS TO HAVE THOSE!"


Right?
 
 
THEN,...


like Gru says "LIGHTBULBBBBBBBBB" in Despicable Me, I had an idea. (insert song Fun, Fun, Fun)...


I literally JUST cleaned out my closet and was about to give away this wretched red and navy striped turtle-neck shirt thing. I'm not sure when it was "in style" but it was about to get a new home, G.
Willy. Sick. What is that shirt even? Yowza!


AND I remembered that Hannah was "playing the kitty" at school and got a hole in some of her good black GAP leggings. I was SO not happy about that.
See:


This was the perfect scenario. I have all of the stuff I need to make some of these cute leggings that look like your kid is wearing leg warmers but without the extra layer! Just built in cuteness. You all know I love accessories but sometimes leg warmers on top of leggings are too hot for little girls who run and play all day!
 This literally took me 15 minutes. It would have taken less if I didn't have to watch a manic 9 month old who was crawling all over the house at the time.
  
 
All I did was cut off the bottom half of the leggings that had a hole in them. Then I matched the part I cut off to the sleeves on the shirt, and cut the sleeves the same length. Then, I just sewed right sides together, matching up raw edges. I used a tight zig zag stitch b/c I was working with knit.
 Crazy stuff I tell ya! - Slips all over the place!

 (Oh and I forgot to mention the sleeves were the perfect width for the leggings. If you end up trying this and your kid is smaller you might need to find a long sleeve shirt that has sleeves that match the width of your kids leggings.)

 It was perfect because the hem on the sleeves were already done for me- no extra step there for this mamma!


Once done, I sewed on the buttons by hand, (I let the kiddo pick the thread color so she could contribute) and had some awesome new leggings! We named them the Half & Half Leggings.
You will come to find out, that around our house normal things get wild and crazy, wacky names. That's how we roll.  

Now I kinda want to go threw all of her leggings and make them all look like this..... hmmm... better wait until she gets holes in them again, right? We'll see!

 SO


DARN


CUTE!!!


Here she is giving the camera some tude.


XOXO- L


For behind the scenes photos from ODDS OF PINK, follow me on INSTAGRAM: Laurosario

Monday, March 4, 2013

What can you do with half a yard of fabric?

There are about a million things you can do with HALF a yard of fabric!


Last week I showed you the fabric I ordered for the bedroom face lift here. I actually had half of a yard left of some of this beautiful ikat-ish Lark print by Amy Butler. Half a yard was actually all I ordered but we didn't use it. We thought about using it for a pillow in the bedroom but once it arrived it was too blue and red. Not what we were going for.

Spring is coming ( I hope sooner than later!!!!), and my girl loves to wear tights with feet in them, (that's what we call them at our house, really we just mean tights), on those chilly spring days. She already has a million skirts and dresses. So how about a cute pair of cuffed Bermuda shorts! We could use these on our up coming beach vacation too!

 
How much fabric do you need for this!? Well, if you are very careful about your pattern layout (and you don't choose a directional print, (for the beginners out there, that just means that the fabric can really only go one way because of a picture on the fabric or words that you can't read unless they are placed in the right direction, hence- "directional"), you can make some cute cuffed shorts with just half a yard of good old quilters cotton.

What better way to use a half yard! I made a large size 5, so if you are super careful you can make it work! Smaller sizes will be easier.

 
Just get a pair of pants that fit her well, or buy a pants pattern and lay them, (or the pattern) out on the fabric so that it leaves a few inches for each of what you will use for the cuffs and make sure you have enough to use these on the width of the shorts. I think I left the width of the shorts (unsewn) by 4 about inches, and I had enough. The cuffs will be shorter - but oh so CUTE!

 This can be tricky so move it around until you get it just right! Then, cut, sew the pants, add the cuffs, insert elastic, and voila! 


I always despise patterns that tell you you need more than what the pattern really takes. If you are the type of person who buys fabric just for a specific project this doesn't always work for you if you don't want to spend more than you have to.
 
Well the heck with them, and those stinky patterns that tell you you need more fabric than you really do!
Make the half yard work girl!

Typically you can get really nice designer fabric, (I am sort of  totally a designer fabric snob) for about 8-9 dollars a yard, so these shorts really cost me about $4-4.50 and about an hour of my time!


Hannah loves getting new clothes and we always have to have something new to take to the beach! I can't wait to see her romping around the beach in these and some cute sandals! Hmm do I need to order more of this fabric so Emmie has some matching ones? Maybe!
 
PERFECT


What would YOU make with half a yard of fabric?
The possibilities are endless!
 

Friday, March 1, 2013

BEDROOM FACELIFT

I used to love this quilt. We have had it in our bedroom for a while now. But one morning I woke up and was like, "This has GOT to go!" Not sure why, but I just decided that I hated it. Not only that, I hated the whole bedroom, pillows, side lamps, everything. So I decided the whole darn bedroom needed a facelift.

This is how I went:


First, I consulted the hubs on fabric. He wasn't too keen on looking at one of my favorite fabric websites for a few hours minutes with me. But he likes to give his imput on how we decorate our home. We came up with a few prints we liked. We weren't sure which we were going to use for sure but we were positive that we liked them all!

 
We ended up using all of these except for the lime green Maasai Mara print and the Amy Butler print. Oh, and did I mention that all of that fabric was under $45 bucks - I think I got about a yard of each, except for the Poodle Marnie. That was on sale. I got 2 yards of that. And the Claridge was a pretty price home dec print so I just got half a yard of that. 
 
 I love to scavenge (Is that a word?) for Fabric.com coupons and this time it paid off. I think I got about 15% off this order.  To find their coupons just google fabric.com coupons. A lot should come up that you can use if you aren't a regular customer who uses everyone she finds.

I was able to do so much with all of it: 
  • Made 2 average size throw pillows (18 x 18)
  • * (Tip: all you need is 1/2 a yard of fabric and a 18" zipper to make one 18x18 throw pillow)
  • I covered a mini lamp shade
  • Made 1 large throw pillow, about the size of a standard pillow
  • Made 2  standard size pillow cases.
  • I also have scraps left over to make more stuff! - that will come in future posts!
Other Supplies:
  1. Sewing Machine
  2. Thread - I used whatever I have in my machine at the time.
  3. 3 zippers - From fabric.com but you can get them at Joanns for about a buck each.
  4. West Elm- Thank you very much for putting the gorgeous gray and white striped duvet on sale that I splurged on!  - I think it was like $139.00? --- Whoops. You only do this once in a while right? It's worth it. And you spend more time sleeping than doing anything else in your life, you deserve nice bedding.
  5. Hot glue gun - On hand
  6. 1 can of white spray paint - $3.95 (the kind with the primer built in)
  7. 2 plain lamp shades from Lowes - about $6.00 each
How totally cool is all of that? You can do a super easy bedroom face -lift for under $200.
 
 
Here is how it all came together.
 
 
Throw pillows all nice and neat. All together it probably took me an hour to sew all of them.Basically, if you can sew a straight line, you can make a pillow, I did these with zipper closures. Which I have to admit I was scared of at first but after thinking about it for a while it was so simple. I plan to make all future pillows with zipper closures now.
 
 
See, the zipper is on the side all nice pretty!
 
 
Covered this $4.00 lamp shade from Hobby Lobby...it was the kind that comes with this sticky stuff on the shade, you just pull off the outside sitcker part, trace the pattern that comes with it onto your fabric and then carefully attach the fabric to the shade. I used a hot glue gun to get the edges to stay down. This was one of those PITA (know what I am sayin') parts of the project but the end shade is custom- and SO cute!


In addition to that lamp,  I spray painted the side lamps white and replaced the shades. They used to be black and had French-like lamp shades on them. These are just simple shades from Lowes.


I love custom pillow cases. Occasionally, I will buy new pillow cases at Marshall's or TJ Maxx if they are on sale, but I wanted new ones to pop under the gray and white West Elm shams.  Pillow cases are SO easy to sew. Just a few straight stitches. I love to do them burritto style because then all the seams are enclosed. Just google burrito pillow case tutorial and a ton of directions come up.its a super easy project for the beginner seamstress!
 
  
When it was all done, it looked like this.


I LOVE LOVE LOVE the end result!!! My fabulous friend from my NBC days (who is now a big wig at HGTV) even said it looked great- TOTAL HONOR!! He has an amzing blog over at Decor Demon. He is fab, check him out!
 
Tootles for today my friends!
 

For behind the scenes photos from ODDS OF PINK, follow me on INSTAGRAM: Laurosario
 

Thursday, February 28, 2013

Stretch Lace or Knit Headband Tutorial

 I often get questions on where Emmaline gets her cutie tootie headbands and bows.

 
Well, I MAKE all of them. Surprised?

You can make them too! You don't even need a hot glue gun, needle/thread for this simple little trick!
 
If you can use scissors and measure- YOU can do this.

All you need is:
- Stretch lace or very stretchy knit. I got mine at my favorite fabric store. Or you can just pick up some very stretchy knit at Hobby Lobby, or Joanns. The possibilities are endless. Stripes, polka dots, every color. - and almost no work from Mamma!
- Scissors
- Your baby girl 
 
HERE WE GO!


All you need to do is take your fabric, (in this case I used a stretchy hot pink lace fabric and a very stretchy red knit I had on hand. 

Cut a piece about 1/2" (make this wider if you want the headband part to be thicker) by 21 or 22 inches. I have a 9 month old so I used 22.
 
 
These are my measurements:
BUT
you can ways make it shorter so just go up an inch or two if you are worried when cutting into your fabric.
 
 I totally understand wanting to make SURE your measurement is correct. Sometimes this FABRIC stuff is expensive!!
You can also make it longer simply because babies just grow!! Right? OR, better yet, make it longer if you want a bigger bow!

What I am showing you will make a cute little knot type bow.

I would make it:
  20"  x 1 1/2" - newborn
21"  x 1 1/2"- 3 months
22" x 1 1/2" - 6 months
23" x 1 1/2"- 9 months
24"x 1 1/2"-12 months
  
Then take it to your baby- I couldn't hold Emmie and take this shot at the same time but just take your strip and wrap it around her head loosely- and tie it in a knot! NOT TOO TIGHT. Loose but fitting.

 
When you are done, it will look like this:
 
 
Isn't it adorable? Easier than, easy peasy- just plain CRAZY EASY!


SO ADORABLE

 
Now go get your knit and do it again!


BYE FOR TODAY!

  
DO NOT COPY OR REDISTRIBUTE THIS TUTORIAL OR PHOTOGRAPHS CONTAINED IN THIS POST IN ANYWAY.
FOR PERSONAL USE
COPYRIGHT 2013