Thursday, February 28, 2013

Stretch Lace or Knit Headband Tutorial

 I often get questions on where Emmaline gets her cutie tootie headbands and bows.

 
Well, I MAKE all of them. Surprised?

You can make them too! You don't even need a hot glue gun, needle/thread for this simple little trick!
 
If you can use scissors and measure- YOU can do this.

All you need is:
- Stretch lace or very stretchy knit. I got mine at my favorite fabric store. Or you can just pick up some very stretchy knit at Hobby Lobby, or Joanns. The possibilities are endless. Stripes, polka dots, every color. - and almost no work from Mamma!
- Scissors
- Your baby girl 
 
HERE WE GO!


All you need to do is take your fabric, (in this case I used a stretchy hot pink lace fabric and a very stretchy red knit I had on hand. 

Cut a piece about 1/2" (make this wider if you want the headband part to be thicker) by 21 or 22 inches. I have a 9 month old so I used 22.
 
 
These are my measurements:
BUT
you can ways make it shorter so just go up an inch or two if you are worried when cutting into your fabric.
 
 I totally understand wanting to make SURE your measurement is correct. Sometimes this FABRIC stuff is expensive!!
You can also make it longer simply because babies just grow!! Right? OR, better yet, make it longer if you want a bigger bow!

What I am showing you will make a cute little knot type bow.

I would make it:
  20"  x 1 1/2" - newborn
21"  x 1 1/2"- 3 months
22" x 1 1/2" - 6 months
23" x 1 1/2"- 9 months
24"x 1 1/2"-12 months
  
Then take it to your baby- I couldn't hold Emmie and take this shot at the same time but just take your strip and wrap it around her head loosely- and tie it in a knot! NOT TOO TIGHT. Loose but fitting.

 
When you are done, it will look like this:
 
 
Isn't it adorable? Easier than, easy peasy- just plain CRAZY EASY!


SO ADORABLE

 
Now go get your knit and do it again!


BYE FOR TODAY!

  
DO NOT COPY OR REDISTRIBUTE THIS TUTORIAL OR PHOTOGRAPHS CONTAINED IN THIS POST IN ANYWAY.
FOR PERSONAL USE
COPYRIGHT 2013

Wednesday, February 27, 2013

Sleep Sack Extender - a sort of tutorial

Ever have something that works so well for your child that you just want them to be able to use it forever! I do! It is Emmie's sleep sack!


I am really paranoid that she is going to suffocate with blankets- so she has been wearing these things since she was teeny tiny.... See how teeny she was- awww so cute!
 
 
Ok so we only have one of these and we aren't planning to have more kids- and I didn't want to buy another one of these things because they are like $25 bucks at most places. Why spend that if I could easily extend the life of the sleep sack, by just adding a band of fleece to the bottom of it and make the arm holes bigger?
 
SUPER EASY!
 
I didn't get all the pictures I needed to show you this but it was so easy that you will get the idea! Here goes: and it doesn't have to be perfect- she will just be sleeping when she wears it!


Sleep Sack Extender Tutorial

All you need is:
  • - A small sleep sack that your baby little angel has almost grown out of
  •  
  • - Sewing machine (or you could do it by hand I suppose if you wanted)
  •  
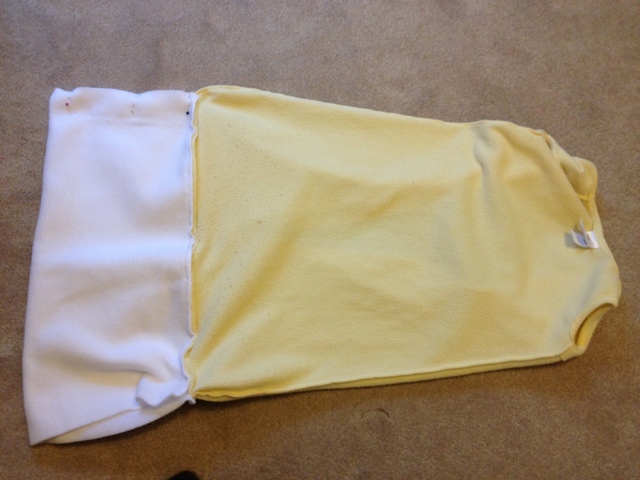
  • - A piece of fleece or flannel about 18 x 19 - or however long you want it to be. Use the sides of the sack (inside out) to match up the edges to get your width. Then put your kid in it and see how long it needs to be. I needed a good 9 inches added so that is where the 19 came from (plus seem allowance).
  •  
  • -Thread- (doesn't have to match)
  •  
  • I used about a 1/2 seem allowance.
 First- With your sleep sack right side out, cut the bottom off- stay close to the seam, and only cut off about an inch in lengh.

Second- Start with your sleep sack RIGHT SIDE OUT.
Take the RIGHT side of the bottom of your sleep sack and the RIGHT side of your fabric (this will be the width side) line up the edges and sew a straight line to connect the two. I just used a straight stich b/c I was using fleece and it doesn' fray. If you are using a material that will fray, just use a tight zig zag stitch.
 

ALERT!
 I don't have a picture of this I AM SO SORRY! I hope I can explain it so you can understand b/c this may be the trickiest part! Just go slow and read carefully.

Third: Flip your sack INSIDE OUT and bring the RIGHT sides of the fabric together and sew down that side, just like you did the first one. This will connect them so you almost have an inside out bag. 

Fourth: Keeping your sleep sack INSIDE OUT........... match up what should be at this point the remaining open sides where the pins are in the photo (your length measurement). And sew down each side.

You are done with that part.
 
Now on to the arm holes:


First: Turn your sleep sack RIGHT SIDE OUT
 (Now this might be painful, but heck you already cut the bottom off the thing! And it isn't going to be THAT purrrrtty in the end, but it will fit your baby better- and remember you didn't have to buy ANYTHING)
 
 Cut a small slit on the armhole seam about an inch down - on both arm holes.


Second- Take it to your machine:
 

Fold back each edge you just cut and ---  sew it down! (foldover twice if you are using a fabric that will fray)- Repeat on the other arm hole


And now you are DONE!


Wasn't that easy? Miss Emmaline even decided she would model it for you!


nope- she doesn't sleep with her bows in--- it's just for cuteness.
 
It's even trendy color bock-ish --- Hmm- maybe not?

 
xoxo- Lauren
 
 
DO NOT COPY OR REDISTRIBUTE THIS TUTORIAL OR PHOTOGRAPHS CONTAINED IN THIS POST IN ANYWAY.
FOR PERSONAL USE
COPYRIGHT 2013

Tuesday, February 26, 2013

The Giving Tree

Did you have a favorite book when you were a little kid? One that you couldn't get enough of no matter how many times you looked at it, or how many times you read it?
 I did- it was:

THE GIVING TREE
 

I'm not sure what it was about the book. Maybe it was that it didn't have that many
words, or that it was simply illustrated....
 

Whatever it was it stuck with me, into adulthood.


Well, last night my sweet daughter Hannah chose this book to read at bedtime. And when we were done, she said that they had this book in her classroom at school, and that she was sad when one of the other friends got to look at it and she had to choose something else....


And my response to that: "ME TOO!" Mommy had THE same thing happen to her when she was your age, Hannah! --and the conversation didnt end there---- opened up a world of questions from my mini.

SCORE!
 
Do you have a favorite book? Do you remember taking the same book out at the school library every day when you were a kid? I guess the moral if the story is -

READ TO YOUR CHILDREN 

at bedtime- those moments will probably be the most precious moments you will
EVER
have with them.


Monday, February 25, 2013

SALE SALE SALE


I love my fans so much, that I am having a sale at the Polka Dot Pear!!


I'm Here!

After much thought and consideration, I am here in dun, dun, dun......

blogland

(aka;the scariest place on earth). Period.

How did this happen? Sigh...

This is a very horrifyingly scary thing for me. BUT- I want to share, I want to create and I want to document all of the fun things I do and make. What better way than to start with a little old blog with little old me? I guess?! - Let's hope!  

So----here goes-  I am a working mamma of 2 beautiful girls and have an amazing husband.
I love to make things for them, and our home. I LOVE learning how to do new things, I love to read blogs and tutorials, and I love a good bargain! I also love to photograph and to style all of these things as I go! Oh and I love to post to Facebook, and I love to read your comments!


I also run an  etsy shop on the side, the Polka Dot Pear. Where most of my items are modeled by my slaves girls. :)

Hannah, 5 1/2:

Emmaline, or "Emmie Jo" - 9 months:


For years now I have wanted to try this thing out. So here I am- I am going to give this thing a whirl. This is me:


All I ask is that you respect me. I am creating this blog as a hobby, and because I want to document the things I do- and show you all of the crazy things I get myself into. If you have something negative to say- keep it to yourself - deal? Ok- that's settled.

P.S. In the coming weeks I plan to show you a bedroom redo, things I am sewing, how I come up with things to make my kids, deals and steals...... and
 much more!  


xoxo

- Lauren